Connecting an HC-06 Bluetooth Module to Teensy 3.1
This page will describe how to set up bluetooth and send commands from a
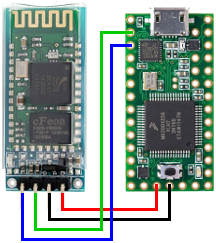
cell phone to the Teensy. Connections are made as in the schematic, and
power is supplied from the USB port.
Load this sketch into the Teensy:
This code turns on the power LED and waits for input from a bluetooth device. Sending "0" will turn off the LED. Sending "1" will turn is back on. Note that the code is also marked as to which input comes from the serial console, and which comes from the bluetooth device. This is a very simple example, but it provides a framework for accepting more complex commands.
You can change the information on the bluetooth module. The HC-06 defaults to command-mode, then goes into transmit mode when you pair with it. Plug the USB port into your Teensy but do not pair with the bluetooth device yet. Launch the serial monitor from the arduino desktop program. The AT-commands are case-sensitive, so you MUST enter them in all upper-case. Start by typing "AT+NAME" in the serial monitor and clicking the send button. In a couple seconds you should receive the reply "OKsetname". This means you can successfully talk to the device and it is in command mode. Now try changing the name to something meaningful: "AT+NAMEdrgw_13". Once you set the name, try scanning for new devices on your phone. If you previously paired with the BT module already, it will continue to show the old name until the first time you pair with it again.
You can also set or delete the pin number with "AT+PINxxxx" where the x's represent up to a 4-digit number. Leaving off the number will erase the pin.
AT+VERSION
AT+NAMExyz★Change name
AT+PINxxxx★change pin, xxxx is the pin number
AT+BAUDx★change baud rate, x is baud rate code
1=12002=24003=48004=9600
5=192006=384007=576008=115200
9=230400A=460800B=921600C=1382400
★No space between command and code